Showing posts with label Snacks. Show all posts

KLEPON (Glutinous Rice Balls with Palm Sugar)

Posted by Lisa on Tuesday, July 16, 2013. Filed under: , , ,
4 Comments


Klepon  is a traditional rice cake, popular in Indonesia and Malaysia. It is a boiled rice cake made from glutinous rice powder, stuffed with liquid gula jawa (palm sugar), and rolled in grated coconut. Klepon is green because it is flavored with a paste made from the pandan or dracaena plant whose leaves are used widely in South East Asian cooking. In other parts of Indonesia, such as in Sumatra and in neighboring Malaysia, klepon is called as onde-onde.

KLEPON

Ingredients:
200 grams glutinous rice flour
180 ml water
2 drops pandan paste or essence
75 g gula Jawa (palm sugar), finely chopped
1 cup freshly grated coconut
1/2 teaspoon salt

Directions:
Place the glutinous rice flour in a mixing bowl and slowly add the water and pandan paste, mixing with your hands. Stop adding water when the dough forms a ball that pulls away from the sides of the bowl but doesn't stick to your hands.
Pull off about 1 teaspoon of dough and flatten into a disc. Place about 1/2 teaspoon of sugar in the middle. Fold up the edges and seal completely. Roll into a ball about 2 to 3 cm in diameter with the palms of your hands. Place on an oiled plate. Repeat until all the dough or sugar is finished.
Heat a large pot of water until it starts to boil. Prepare a large bowl of cold water. Combine the grated coconut and salt on a plate.
Drop the balls one by one into the boiling water, making sure not to overcrowd the pot. When they float to the surface, let them cook for one more minute.
Remove the balls with a slotted spoon and dunk them in the cold water. When they are cool, remove and drain well before rolling in the coconut-salt mixture. Serve immediately


Potato Doughnuts

Posted by Lisa on Thursday, June 13, 2013. Filed under: , ,
3 Comments


Who doesn't love doughnuts?
It is the most favorite and comforting snack in our home.  My mom used to make hem for me when I was a kid, and now I make them for my children.  I don't normally use any measurement when I make doughnuts, because I do it often enough to make me remember all the ingredient by heart.  Today I'm trying to write down the recipe, but my suggestion is always use your 'feeling' when you try it. The addition of mashed potato will make the doughnuts softer, even until the next day. 

Ingredients:
- 450 gram all purpose flour
- 50 gram milk powder 
- 11 gram instant yeast
- 100 gram sugar
- 200 grams potatoes
- 2 egg yolks
- 150 ml cold water
- 75 grams butter
- pinch of salt

Directions:
1. Wash potatoes, boil them until tender and cooked. Peel off the skin while they still hot, then immediately mash it using potato masher (a fork also works fine). Set aside to cool. 
2. In a large bowl, mix together flour, instant yeast, sugar and milk powder, and then add mashed potato and egg yolk.  Mix well.  
3. Add cold water while you knead the dough well, and last add salt and butter to it.  Continue to knead the dough until it is smooth and do not stick on hands. Let the dough stand for about 1 hour to inflate.  The dough will rise to double size,


5. Punch the batter to remove the air, then roll in about 1 cm thick. Cut using the doughnut cutter and let stand for another 15 minutes.
6. Heat oil in a skillet over medium heat. Put the dough one by one. Pour the oil over the doughs until get fluffy and cooked. Remove and drain.
7. After the doughnuts completely cooled, you can add the topping or glaze as you like. 


Bolu Sakura (Caramel Steamed Cake)

Posted by Lisa on Friday, November 16, 2012. Filed under: , ,
5 Comments

So, here I am updating this blog after more than 5 years break! LOL
I start to do my old hobby of baking lately but never thought of continue to document it in this blog, until some friends asked me to. I have my oven back in my kitchen, even though I don't have anymore baking tools collections like I use to have few years back.  I'm not planning to bake everyday anyway.  So, let's see what I can do.

I made this steamed cake a week ago, and then I found out that Miss B from Everybody Eats Well in Flanders is hosting Aspiring Bakers #25 - Steaming Hot Cakes (November 2012).  I decided that this could be one of the right reasons to start to write again, LOL.

Bolu Sakura (Caramel Steamed Cake) is one of Indonesia's popular steam cake.  We can find it in almost every part of Indonesia.  This is my first time to make my own Bolu Sakura, and I am really happy with the result.  


Ingredients:
500 grams granulated sugar
500 ml of boiled water
220 ml chicken eggs (4 eggs medium size)
100 melted butter/ margarine
1 tsp vanilla
Butter/veggie oil to spread

Sift together:
450 grams all-purpose flour
1 tablespoon baking powder
1 tablespoon of baking soda
1/4 tsp salt

Direction:
1. Prepare some small sakura/ flower cake molds, spread with butter/vegetable oil. Set aside. Heat up water in a steamer to boil. Wrap the steamer lid with a cloth napkin.
2. Place 250 grams sugar into a pan and and cook until it turn brown and caramelized. Pour the water gradually, do not stir instantly. Let it cook until boiling then have it a stir. Put a side.
3. Beat eggs, vanilla with the remaining sugar until thick and fluffy. Pour the caramelized sugar while keep beating at low speed until blended. Turn off the mixer.
4. Stir in the sifted-flour until well blended. Add melted butter/margarine gradually, stirring gently with a spatula until well blended.
5. Pour the batter into each mold up to 3/4 full. Steam for 15 minutes until cooked. Take it out from steamer. Let it cool slightly then remove from mold. Serve.

PS: If you don’t have those small molds, you may use a cake/pudding mold (made from plastic).

servings: 40pcs (small molds)

Rainbow Layers Steamed Cake (Kue Lapis Kukus)

Posted by Lisa on Sunday, April 8, 2007. Filed under: ,
22 Comments

This is my Mom's style of Layers Steamed Cake. Layers Steamed Cake is one of many popular snacks in Indonesia. And I love it when my Mother make it. I never make this cake as perfect as she does. I always have a problem with the layer's. It never be flat and smooth.. hahaha.

For the colors, red, white and green are always be the favorite. But you can use any other color of course. Brown color of chocolate is often use to replace the red layer. Even if you don't wish to use food color, just leave it. It will not give any differences with the taste. But you will not get the beautiful appearence and good aroma of the cake, of course.

This steamed cake doesn't need any butter or margarine. To make it soft, we use coconut milk instead. And if you don't have cake emulsifier in your kitchen, don't worry. Just leave it. You still can make the cake even without it.


Ingredients:
6 eggs
250 grams sugar
1 tsp cake emulsifier (optional)
200 -250 grams all purpose flour (approx)
2 glasses of thick coconut milk.
2 pandan leaves
1/2 tsp salt
red & green food colors

1. Arrange a large steamer over boiling water. Make sure it is large enough to hold the baking pan and there is enough water to make a lot of steam.
2. In a large bowl beat together with an electric mixer : eggs, sugar and cake emulsifier on high speed until light and fluffy (the mixture has increased about three times in volume)
3. Add the flour and coconut milk alternately in batches. Mix-well with a spatulla.
4. Divide the batter into 3, add each part with avalable food color. Mix well.
5. Pour one color batter to a greased pan, Place the pan into the steamer. Cover the top of the steamer with a kitchen towel, and place the lid on top; the towel will absorb any steam that collects on top from dripping onto the cake. Steam for about 5 minute, then pour over the first layer the next colored batter, and steam for another 5 minutes.
6. Pour the last layer and then steam the whole cake for around 20 - 25 minutes.

Kue Lapis Tepung Beras

Posted by Lisa on Wednesday, December 27, 2006. Filed under: ,
5 Comments

Kue in Indonesia is a word given to a lot of variety of food such as cakes, breads, cookies, puddings, savoury snacks etc. This Kue Lapis means Layers Cake. But it is not a baked cake. Most common method to prepare traditional snacks and appetizers in Indonesia are steam and fry. Just like this Kue Lapis.

There are 2 kinds of traditional Kue Lapis. First is the one made from rice flour (Kue Lapis Tepung Beras) and the other is made from Sagoo flour (Kue Pepe). Both Kue lapis have the same method of cooking.

This Kue Lapis I post here is my mother's recipe. Normally, she will use fresh Pandan Leaves and Suji Leaves to get the green color and the aroma. But we can use Pandan Pasta instead. Because it's kind a difficult to find the leaves here in India. If Pandan pasta is not available, replace it with green food color (or any color you like) and a little vanilla ekstract to get the good aroma.

Ingredients:
3 glass rice flour
1 1/2 glass sagoo flour
1 1/2 glass white sugar
6 glass coconut milk from 1 big size of coconut
Pandan Leaves, torn and knotted
1/2 tsp salt
few drops Pandan Pasta (or food color)

Combine sugar, coconut milk, salt and pandan leaves in a saucepan. Bring to a boil and stir constantly to dissolve the sugar. Strain and set aside until it become lukewarm.

Put rice flour and sagoo flour into a large mixing bowl. Pour in the coconut milk gradually and mix well. Strain the batter if needed to make sure there are no lumps in the batter.

Divide the batter into 2 Add few drops Pandan Pasta (or food color) to the half part of the batter and leave the other part white (I divide it into 1/3 part green and 2/3 part white).

Heat an oil greased 25 x 25 cm pan inside a hot steamer for 5 minutes. Pour 50 ml (1 ladle) of white batter into the pan. Cover the steamer and steam for 5 minutes until it getting firm. Open the steamer and pour 50 ml (1 ladle) green batter over the white, and steam for 5 minutes.

Repeat the procedure, alternating white and green batter until all the batter is used up. After the final layer is set, steam for a further 20 minutes. Remove from steamer and let it cool. Serve by cutting the kue with an oil greased knife.

Onde-onde Ketawa

Posted by Lisa on Monday, December 25, 2006. Filed under: ,
3 Comments

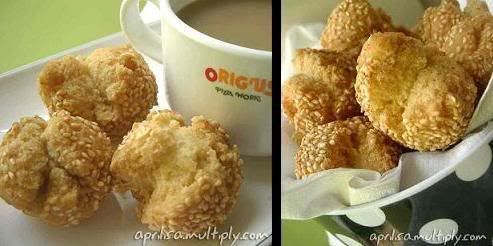
Onde-onde ketawa. It means Laughing Onde-onde (!?). No, better not to translate it to English.... ;-p. It sounds better if we call it just like it should be : Onde-onde Ketawa.

I'm not quite sure from which part of Indonesia this food is originally come. But when I lived in Bumiayu, a small city in Central Java, this food can be found easily. So lets say, it's Central Java...

Actually, Onde-onde is an Indonesian snacks made from white glutious (sticky) rice powder with sweet moong dal paste as filling. The differences between the real Onde onde I mention above and this Onde-Onde ketawa is that the latest one is made from all purpose flour instead of glutinous rice powder. And it doesn't have anything as filling. It makes Onde onde ketawa taste more crunchy and not sticky like the other one.

The cooking method is quite easier. It doesn't take much time to make the batter. But we have to be carefull with the frying method. Use a lof of oil with medium heat only. The balls should be deep-fry in medium hot oil to let them bloom (sorry, I still cant find the right world to decribe it... ;-p) perfectly.

Ingredients:
100 ml water
175 grams white sugar (I used only 150 grams)
1 egg
2 tbsp cooking oil
300 grams all purpose flour
1/2 tsp baking powder
1/4 tsp soda powder
100 gram white sesame seeds
oil for frying

Boil water and sugar in a pan until the sugar dissolved. Let it cool. Beat cooking oil together with egg in a low speed mixer until well combined (2 -3 minutes). Add sugar syrup little by little and beat them for another 1 minute. Sift together flour, baking powder and soda powder into the sugar mixture. Mix well with a spatula.

Make balls (10 grams each) from the batter. Drop it into water, then roll it over a bowl of sesame seeds. Deep fry the balls in medium hot oil with medium flame until golden brown. Remove from pan. Drain it with kitchen towel.


Cireng

Posted by Lisa on Saturday, December 23, 2006. Filed under: ,
4 Comments

Cireng is a short name of Aci Goreng, which means Fried Aci (Kanji). Actually I'm still a little bit confused which one Aci (Kanji) is. Is it Tapioca or Sagoo starch. In this recipe, I used Tapioca for 2 reasons. First is because actually both starch are similiar. And second one is because that's the only starch I have in my kitchen... ;-p

In Indonesia, we can find this fried snacks easily in 'Tukang Gorengan' (I dont know how to translate it to English, sorry ;-p). Thats how we call someone who sells Fried Snacks in Indonesia. If you want to know the taste of this Cireng... well, just imagine how it will be when you bite a rubber... ;-p. I mean, the food is very elastic, especially when it is alerday cold. So eat them when they are stilll hot... By the way, I really enjoy chewing it when it's cold.. hehehe

100 grams Aci (kanji) --> Tapioca Starch
1 tbsp all purpose flour
75 ml water
1/2 tsp white pepper powder
1 tsp salt
1 garlic clove, pasted
30 grams soya beans, soak in water until tender
1 stick of spring onion, finely chopped.

Mix all the ingredients until well-combined. Heat oil in a pan. Deep fry 1 tbsp of the batter until become golden yellow and dry. Do it to the remaining batter. Remove from oil.
Enjoy it when it is still warm.
Recipe Source: Dapur Bunda

Lemet (Ketimus)

Posted by Lisa on Friday, December 15, 2006. Filed under: , ,
4 Comments

The third and also will be the last entry for "Proyek Cinta untuk Bunda Inong" is this recipe below. Bunda Inong called it as Lemet, but I knew it as Ketimus. This is one of Indonesian Traditional Snacks. Normally, it contains of tapioca, coconut and jaggery. But in this recipe modified by late Bunda Inong, using banana as filling.


Ingredients:
500 grams tapioca, finely grated (or make a paste of tapioca)
100 grams fresh grated coconut
200 grams jaggery, finely chopped
1 tsp salt
1 tsp vanilla powder (optional)
2 - 3 banana, cut into long pieces
banana leaves as required

Mix all the ingredients until well-combined. Take one sheet of banana leaf. Put one tablespoon of tapioca mixture and add one piece of banana. Wrap them by rolling the banana leaf and fold in both end of the leaf. Repeat wrapping process to the remaning mixture. Put all the wrapped lemet into a hot steamer, and steam for 40 - 50 minutes. Let it cool before serve.

Tips:
- To make the work easier with the banana leaves, heat the surface of the leaves over a small flame. It will make it more soft and easy to fold without breaking it.
- To make the tapioca paste, you can cut them to small pieces and put it in a blender (food processor) instead of grate it.

Recipe Source: Lemet Pisang a la Bunda

Potato Donuts

Posted by Lisa on Tuesday, December 12, 2006. Filed under: ,
3 Comments

My next entry for "Proyek Cinta untuk Bunda Inong" : Donat Kentang (Potato Donuts) . These Donuts are very soft and delicious. Enjoy it with Donut Dusting or powdered sugar for the best taste. For the recipe click here.


Homemade Donuts

Posted by Lisa on Friday, October 13, 2006. Filed under: ,
1 Comment

I got this Donuts recipe from book of Variety of Donuts owned by my friend in Madras. I have made it so many times, so I don't need to look at the measurement of the ingredients every time I want to make it. The taste is good, even my daughter can eat 2 in once ;-p. Well, actually I made them in small size.... :D

For myself, I like it plain. Without chocolate topping, sprinkles, or some powdered sugar. But when you have time, and like to see them in pretty look... just dress them with anything you desire. Crushed roasted peanuts work the best for me. My daughter loves the chocolate, and my husband will eat anything I give him on his plate... ;-p

Ingredients:

500 grams bread flour (I used all purpose flour instead)
100 grams granulated sugar
11 grams instant yeast
1/4 tsp baking powder
1/2 tsp salt
2 egg yolks
100 grams butter
250 ml fresh milk


Directions:

1. Mix together in large bowl: wheat flour, granulated sugar, yeast instant, Baking Powder and salt. Stir them until well-combined
2. Add the egg yolk, and followed by butter. Knead until well-blended.
3. Pour in the cold milk in batches. Mix to form a soft dough. Knead the dough for about 1/2 an hour (if you use hands), until the dough become smooth, light and elastic.
4. Form the dough into a ball, place it in a large bowl and cover it with wet and clean cloth. Set aside for 1 hour.
5. Divide the dough into equal size small balls. Make wholes on the balls using your finger. You can use Donuts shaped cutter if it's available.
6. Deep dry it in hot oil with low-medium flame until it's golden brown and rise.

Tips:

- If you use Active Dry Yeast, dissolve it first in 50 ml warm water before you mix it with the flour. Don't forget to reduce the milk until 200 ml
- Use a wooden chopstick to spin the donuts while you fry it. It will helps you to keep the shape of the whole.
- Let them cool before decorate them with chocolate and sugar